Configuration File Administration
Configuration File Administration Overview
The system supports multiple administrator utilities related to configuration file management. The following table describes the purpose of the different utilities.
The following table lists the Utilities for Configuration File Administration:
|
Utility |
Recommended Usage |
|
Archiving |
Schedule periodic backups to a remote backup server. You should schedule archiving for both the system configuration binary file (system.cfg) and the user configuration binary file (user.cfg). If necessary, you can import an archived configuration using the configuration binary file import/export feature. |
|
Local backup and restore |
Create backups on the local system as a precaution when making significant configuration changes. With this utility, you can quickly restore to a previous configuration. |
|
Binary configuration file import/export |
Export binary configuration files to a local host (an alternative to the remote archiving server and archiving process that runs as a scheduled job). You might do this if you do not use or do not have access to an archiving server, or if you want to make use of a configuration that has not yet been archived. You can export the binary system configuration file (system.cfg) and the binary user configuration file (user.cfg).
|
|
XML configuration file import/export |
Import or export the configuration for only the features and settings you select. This enables you to take a more granular approach to mass configuration management than the binary file import/export feature. For example, you might want to populate an authentication server configuration across a large number of nodes. You can export just that configuration element, and when you import it in the other nodes, you do not overwrite the large number of configuration elements that you would if you had imported the user.cfg file.
|
|
Push configuration |
Push a partial configuration from the running configuration on the source system to the running configuration on one or more target systems. This is the best option to instill common configuration elements if the devices are already deployed and currently online. |
Configuring Archiving for System Logs, Configuration Files, and Snapshots
You can schedule periodic archiving for system logs, system configuration files, and system snapshots. Periodic archiving occurs only at the scheduled time. "Unscheduled" archiving does not occur automatically. For example, if a log file exceeds the maximum file size, the archiving process does not automatically back up the file prior to the scheduled time to prevent data loss.
If the archive process fails, it makes two more attempts at an interval of 30 seconds. If the archiving still fails, it retries at an interval of one hour till the archiving process is successful.
We recommend that you schedule an archive operation during hours when traffic is light to minimize its impact on users. The automatic archiving process compresses files and, if the system is busy, can degrade performance for users. Also, a cluster node might appear unresponsive if the system is busy with traffic and performing archiving simultaneously.
If you schedule an archive operation to occur during the hour that your system switches to daylight savings time (DST), the operation might not occur as scheduled. For example, if your system is set to change to DST at 1:00 AM, and you scheduled an archive job to occur at any time between 1:01 AM and 1:59 AM, then the operation does not take place because at 1:00 AM the system clock is moved forward to 2:00 AM, and the system never reaches the archive time for that date.
To configure log archiving:
1.Select Maintenance > Archiving > Archiving Servers to display the configuration page.
Archiving Configuration Page - Ivanti Connect Secure shows the configuration page for Ivanti Connect Secure.
2.Complete the configuration as described in Archiving Configuration Page - Ivanti Connect Secure.
3.Save the configuration.
Archiving Configuration Page - Ivanti Connect Secure
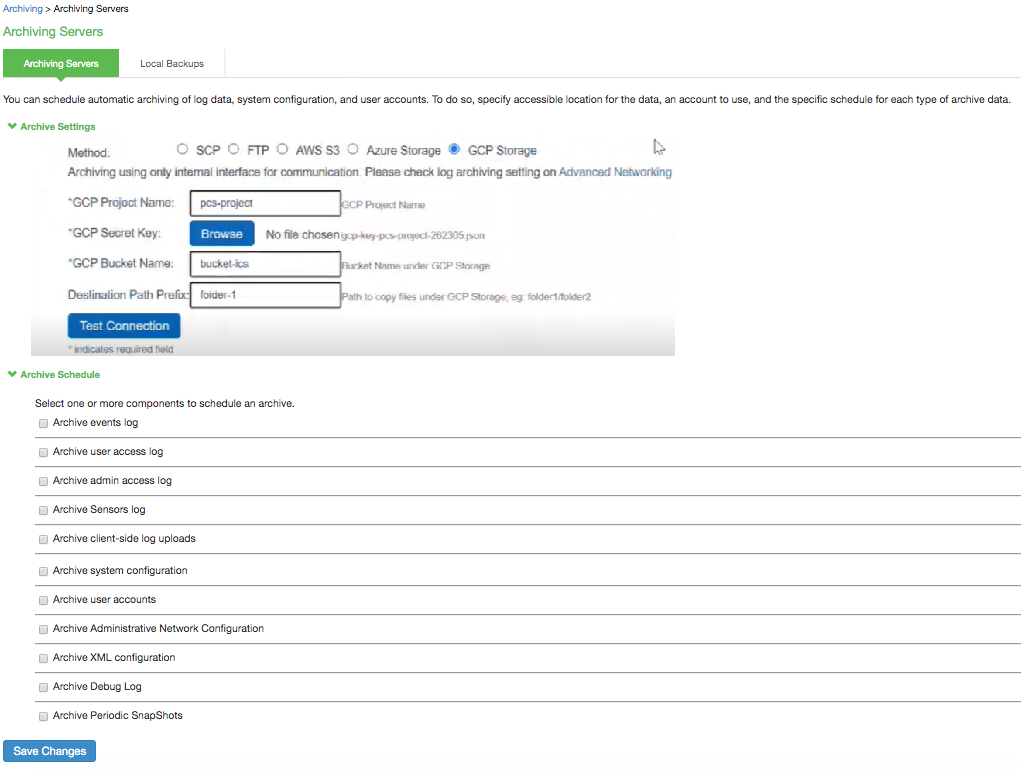
The following table lists the Archiving Configuration Guidelines:
|
Settings |
Guidelines |
|
Archive Settings |
|
|
Archive Server |
Specify the fully qualified domain name or IP address of the server to which to send the archive files. |
|
Destination Directory |
Specify the destination directory. Follow these recommendations: For UNIX systems, you can specify an absolute or relative path. We recommend you specify a full path. For Windows systems, specify a path that is relative to the ftproot directory. We recommend you specify a full path. Do not include a drive specification for the destination directory, such as: ivanti/log. |
|
Username |
Specify a username that has privileges to log into the server and write to the destination directory. |
|
Password |
Specify the corresponding password. |
|
Method |
Select SCP, FTP, AWS S3 or Azure Storage. SCP is the default method. SCP is a file transfer utility similar to FTP. SCP encrypts all data during transfer. When the data reaches its destination, it is rendered in its original format. SCP is included in most SSH distributions and is available on all major operating system platforms. AWS S3: Push backup configurations and archived logs to Amazon AWS S3 bucket. For more details, refer to Ivanti Connect Secure Virtual Appliance on Amazon AWS Cloud Deployment Guide. Azure Storage: Push backup configurations and archived logs to Microsoft Azure storage. For more details, refer to Ivanti Connect Secure Virtual Appliance on Microsoft Azure Cloud Deployment Guide. |
|
Archive Schedule |
|
|
Archive events log |
Schedule archiving for the Events log. The archive file has the following format: PulseSecureEventsLog-[clustername|standalone]-[nodename|hostname]-[date]-[time] For example, an archive file for a cluster named Gen has a filename similar to the following: PulseSecureEventsLog-Gen-node1-Root-20090109-1545.gz. The archiving schedule configuration includes the following options: Use this filter-Select a log format filter. Day of week-Select the days of the week on which to run the archiving job. Every hour or a Specified Time. The Every hour option runs a job every hour on the hour for the selected days. The specified time option runs a job once on the selected days. Clear log after archiving. Select this option to clear the local log file after the archiving job is successfully completed. If an archive job fails, the log files are not deleted. Password-(Optional) Specify a password to secure and encrypt system configuration or user account archives. |
|
Archive user access log |
Schedule archiving for the User Access log. The archive file has the following format: PulseSecureAccessLog-[clustername|standalone]- [nodename|hostname]-[date]-[time] The archiving schedule configuration includes the same options as those described for the Events log. |
|
Archive admin access log |
Schedule archiving for the Admin Access log. The archive file has the following format: PulseSecureAdminLog-[clustername|standalone]- [nodename|hostname]-[date]-[time] The archiving schedule configuration includes the same options as those described for the Events log. |
|
|
|
|
|
|
|
Archive client-side log uploads |
Schedule archiving for client-side log uploads. This option is available only on Ivanti Connect Secure. The archiving schedule configuration includes the same options as those described for the Events log, except for log filter format, which is not applicable to the client-side logs. |
|
Archive system configuration |
Schedule archiving for the system configuration binary file (system.cfg). The archive file has the following format: PulseSecureConf-[clustername|standalone]- [nodename|hostname]-[date]-[time] The archiving schedule configuration includes the same day, time, and password-protection options as those described for the Events log. |
|
Archive user accounts |
Schedule archiving for user account configuration binary file (user.cfg). The archive file has the following format: PulseSecureUserAccounts-[clustername|standalone]- [nodename|hostname]-[date]-[time] The archiving schedule configuration includes the same day, time, and password-protection options as those described for the Events log. |
|
Archive XML configuration |
Schedule archiving for the XML configuration files. The archiving schedule configuration includes the same day and time options as those described for the Events log. Administrator can select the Exclude large-data packages in the archived configuration to exclude ESAP and Ivanti Secure Access Client packages from being archived. |
|
Archive debug log |
Enable archiving for collected debug logs. You cannot specify a day and time for archiving debug logs. If you select this option, debug logs are archived periodically and cleared if the Clear log after archiving option is selected. |
|
Archive periodic snapshots |
Enable archiving for snapshots. You cannot specify a day and time for archiving periodic snapshots. If you select this option, snapshots are archived periodically. |
Using the Configuration Backup and Restore Feature
You can save up to five system configuration backups and five user account backups on the local server. If you exceed this limit, the system overwrites the oldest backup with the new backup. If you do not want to overwrite the oldest backup, select and delete another backup instead, before you save the most current one.
To manage configuration file backups:
1.Select Maintenance > Archiving > Local Backups to display the configuration page.
Local Backups Management Page - Ivanti Connect Secure shows the archiving configuration page for Ivanti Connect Secure.
2.Use the controls to backup or restore the configuration as described in Table.
3.Save the configuration.
Local Backups Management Page - Ivanti Connect Secure
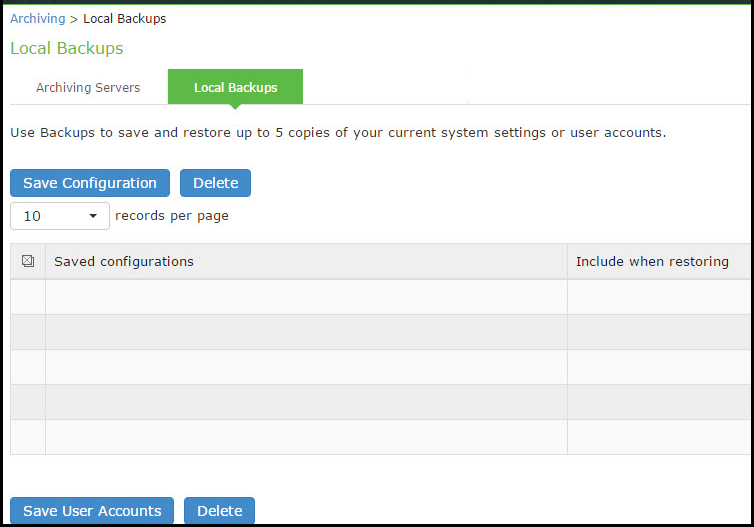
The following table lists the Local Backups Management Guidelines:
|
Controls |
Guidelines |
|
|
|
|
Save Configuration |
Create a backup of the running system configuration. |
|
Delete |
Select a row in the table and click Delete to delete the backup. |
|
Restore |
Select a row in the table and components in the "Include when restoring" column and click Restore to replace the running configuration with the archived configuration. |
|
User Configuration |
|
|
Save User Accounts |
Create a backup of the running user configuration. |
|
Delete |
Select a row in the table and click Delete to delete the backup. |
|
Restore |
Select a row in the table and click Restore to replace the running configuration with the archived configuration. |
Using the Import/Export Feature for Binary System Configuration Files
This topic describes the import/export feature for binary system configuration files.
Binary System Configuration File Overview
The access management framework enables you to import and export the system and network settings using binary system configuration files. When importing a system configuration file, you can exclude the device certificate and the server's IP address or network settings from the imported information. For example, to set up multiple Ivanti Connect Secure systems behind a load balancer, import everything except for the IP address. To set up the system as a backup server, import everything except for the digital certificate and the network settings.
The binary system configuration file includes the following settings:
•Network settings
•Certificates. The system imports only device certificates, not the chains that correspond to the device certificates or trusted client CAs.
•Cluster configuration
•Licenses. When you import a configuration file that contains licenses, the system gives precedence to any existing licenses. Licenses are imported only if no licenses are currently installed.
•SNMP settings
•Sensor configuration. Sensor configurations are included in the system configuration file while sensor event policies are included in the user configuration file. To import or export all sensor-related settings, import or export both the system and user configuration files. The user configuration file, not the system configuration file, includes resource profiles, resource policies, and the local user database. To perform a complete backup, export both the system and user configuration files.
•Client-side logs. To import or export client-side logs, import or export both the system and user configuration files.
•Web proxy servers. Ivanti Connect Secure only. To export all web proxy related information, both the system and user configuration files are needed.
•Web caching options. Ivanti Connect Secure only.
•Rewriter filters. Ivanti Connect Secure only.
Exporting a Binary System Configuration File
When a certificate signing request (CSR) is generated on the ICS device, a private key is created and securely stored on the device. The private key will be exported as part of the system configuration. The system configuration is encrypted to ensure that the data is secure.
To export a binary system configuration file:
1.Select Maintenance > Import/Export > Import/Export Configuration to display the configuration page.
Export Binary System Configuration File Configuration Page - Ivanti Connect Secure shows the configuration page for Ivanti Connect Secure.
2.Complete the configuration and export operation as described in Table.
Export Binary System Configuration File Configuration Page - Ivanti Connect Secure
The following table lists the Export Binary System Configuration File Configuration and Action Guidelines:
|
Settings |
Guidelines |
|
Specify a password to encrypt and secure the configuration file. |
|
|
Confirm password |
Specify the password. |
|
Save Config As |
Display a dialog box to save the file to your local host. |
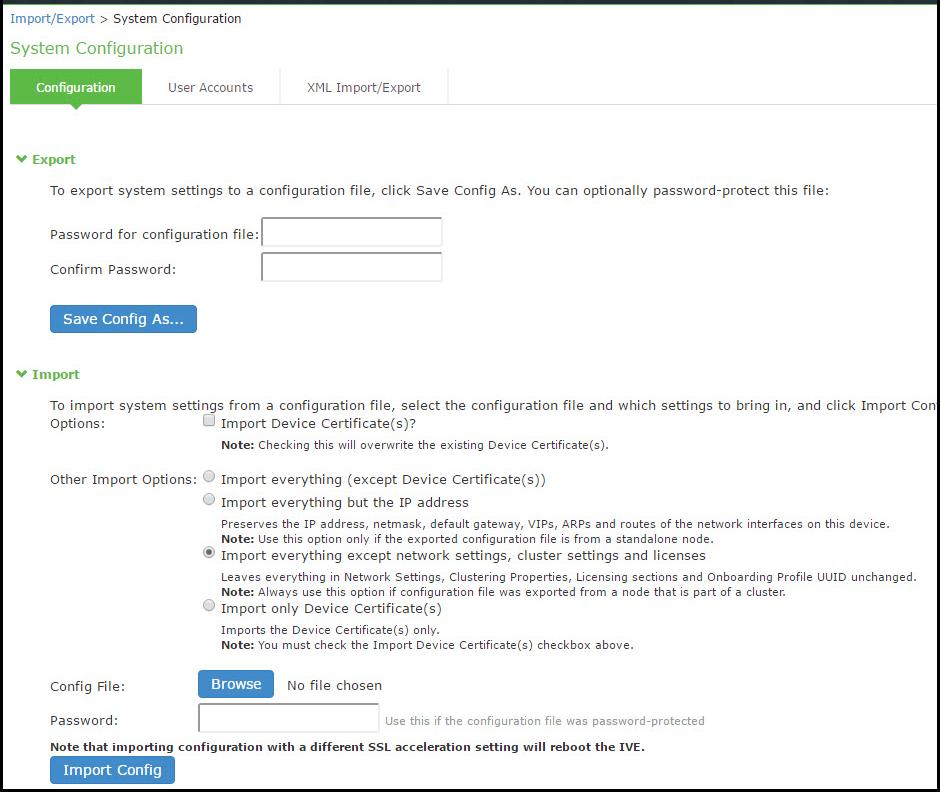
Importing a Binary System Configuration File
To import a binary system configuration file:
1.Select Maintenance > Import/Export > Import/Export Configuration to display the configuration page.
The following figure shows the configuration page for Ivanti Connect Secure.
2.Complete the configuration and import operation as described in the following table.
Import Binary System Configuration File Configuration Page
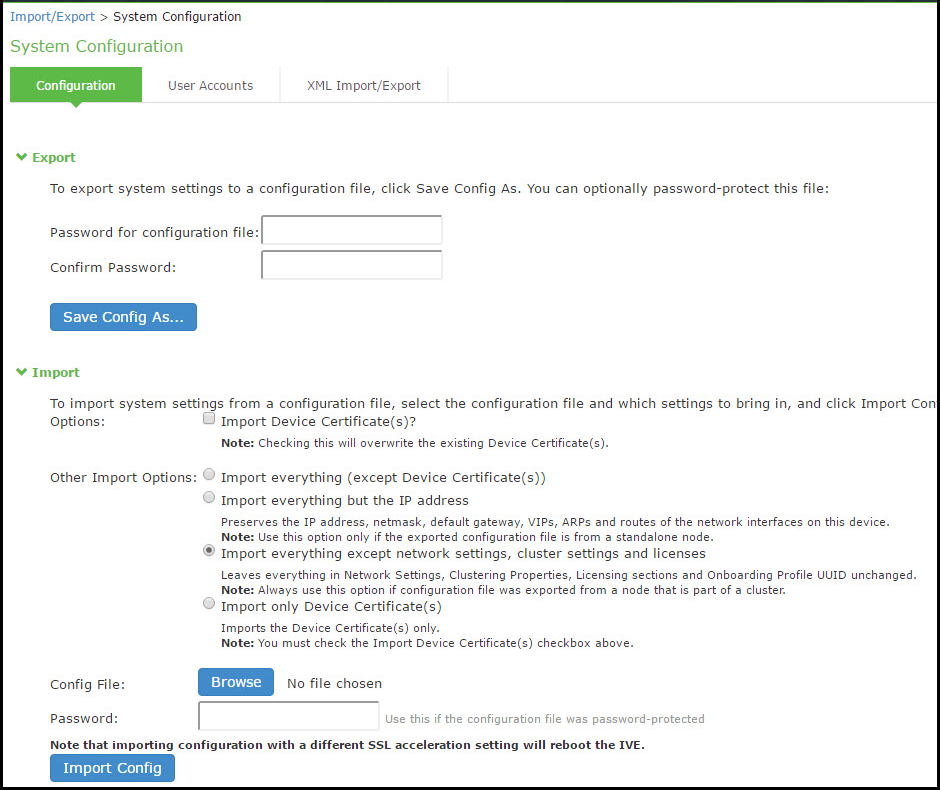
The following table lists the Import Binary System Configuration File Configuration and Action Guidelines:
|
Settings |
Guidelines |
|
Import Device Certificate(s)? |
Overwrite the existing device certificate(s) with the ones in the imported configuration file. When importing a device certificate in to a FIPS device, note that you must choose a certificate that uses a FIPS-compliant private key. To ensure FIPS-compliance, select a certificate and corresponding security world private keys were generated on a FIPS device. |
|
Other Import Options |
|
|
Import everything (except Device Certificate(s)) |
Import all settings except the device certificate. |
|
Import everything but the IP address |
Do not overwrite the existing configuration for network interface IP addresses, netmask, default gateway, virtual interfaces, ARP tables, and route tables. Use this option only if the exported configuration file is from a standalone node. To set up multiple nodes in a cluster behind a load balancer, import everything except the IP address. |
|
Import everything except network settings and licenses |
Do not allow the imported configuration to change the existing configuration for settings found in the Network Settings and Licensing sections. With this option, network configurations, licenses, cluster configurations, certificates, defined SNMP settings and syslog configurations are not imported. Always use this option if configuration file was exported from a node that is part of a cluster. To set up a backup node, import everything except network settings and digital certificates. |
|
Import only Device Certificate(s) |
Import the device certificate(s) only. You must also select the Import Device Certificate(s) check box. |
|
Config file |
Use the browse button to locate and select the file from your local host. |
|
Password |
Specify the password (if applicable). |
|
Import Config |
Import the configuration file. |
Using the Import/Export Feature for Binary User Configuration Files
This topic describes the import/export feature for user configuration binary files.
Binary User Configuration File Overview
In general, if a menu item falls under the Authentication, Administration, or Users menu, the item is included in the user configuration file (user.cfg). The exception is Sensors event policies, which are under System, but which are exported in the user configuration file. In particular, the user configuration file includes the following settings:
•Sign-in settings (includes sign-in policies, sign-in pages, all authentication servers, authentication protocol sets, and Ivanti settings)
•Authentication realms (including admin realms, user realms, and MAC authentication realms)
•Roles
•Resource profiles. Ivanti Connect Secure only.
•Resource policies
•Sensor event policies
•User accounts
•Client-side logs. To export or import client-side logs, export or import both the system and user configuration files.
Exporting a Binary User Configuration File
To export a binary user configuration file:
1.Select Maintenance > Import/Export > Import/Export Users to display the configuration page.
Binary Export User Configuration File Configuration Page - Ivanti Connect Secure shows the configuration page for Ivanti Connect Secure.
2.Complete the configuration and export operation as described in Table.
Binary Export User Configuration File Configuration Page - Ivanti Connect Secure
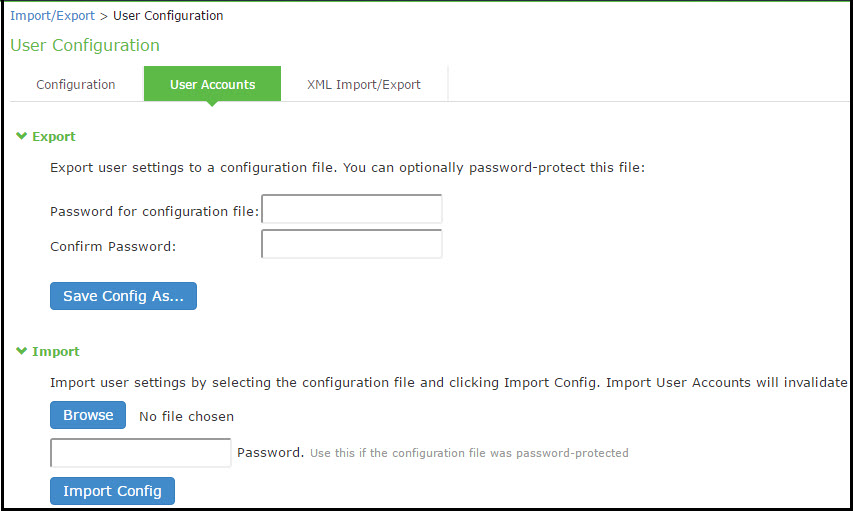
The following table lists the Binary Export User Configuration File Configuration and Action Guidelines:
|
Settings |
Guidelines |
|
(Optional) Specify a password to encrypt and secure the configuration file. |
|
|
Confirm password |
Specify the password. |
|
Save Config As |
Display a dialog box to save the file to your local host. |
Importing a Binary User Configuration File
To import a binary user configuration file:
1.Select Maintenance > Import/Export > Import/Export Users to display the configuration page.
The following figure shows the configuration page for Ivanti Connect Secure.
2.Complete the configuration and import operation as described in the following table.
Import User Configuration Binary File Configuration Page
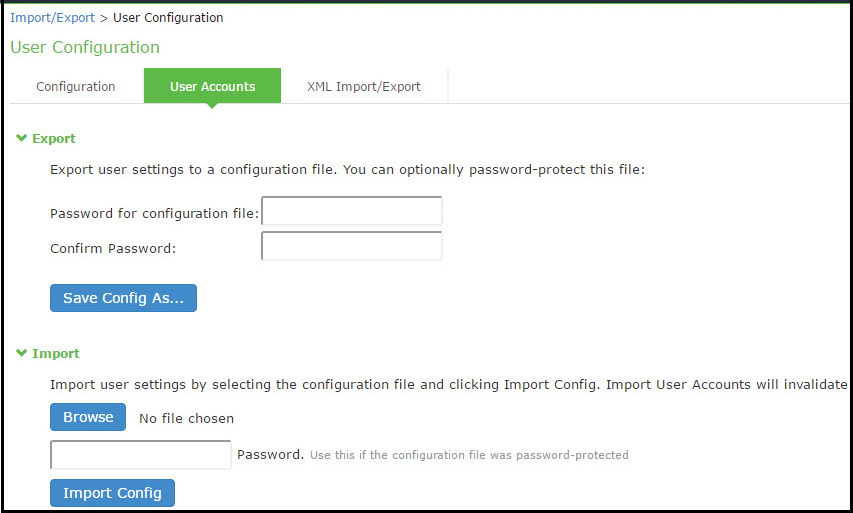
The following table lists the Import Binary User Configuration File Configuration and Action Guidelines:
|
Settings |
Guidelines |
|
Browse |
Locate and select the file from your local host. |
|
Password |
Specify the password (if applicable). |
|
Import Config |
Import the configuration file. |
Using the Import/Export Feature for XML Configuration Files
This topic describes the import/export feature for XML configuration files.
XML Configuration File Overview
The system maintains its configuration in a structured XML file. This enables the system to support an alternative to the complete configurations that are exported and imported with the configuration binary files. You can use the export/import configuration XML pages to export and import selected configuration elements.
You might find the feature useful when performing the following tasks:
•Adding to the configurations of peer nodes, for example, adding a large number of users.
•Modifying multiple instances of a single setting, for example, an authentication server name.
•Deleting settings, for example, deleting authentication servers that are no longer used.
•Creating a configuration template to use for setting up new nodes.
•Tracking configuration changes by comparing differences on periodic exports.
Guidelines and Limitations
The following table summarizes the guidelines and limitations for using the XML import/export feature.
The following table lists the XML Import/Export Guidelines and Limitations:
|
Category |
Guidelines and Limitations |
|
General |
The following guidelines and limitations apply: You can import and export configuration files only between systems running the same software version. If XML configuration to be imported contains one or more Ivanti Secure Access Client packages, we recommend to split the configuration to import only Ivanti Secure Access Client packages first considering one Ivanti Secure Access Client package per import and then import the remaining configurations. You might find it useful to use a text editor to modify configuration elements that ought to be distinguished, such as configuration object names and descriptions. Never modify the names of the NIC identifiers. The system relies on knowing that each appliance has two interface cards, known as NIC0 and NIC1. Immediately after importing an Active Directory authentication server configuration, you must edit the configuration to change the Computer Object name. Unexpected problems might arise if two systems join an Active Directory domain using the same Computer Object name. |
|
Licenses |
The following rules apply to exported and imported licenses: You cannot edit the license data that is exported. It is encrypted. An XML import of licenses is valid only if the system does not currently have a license installed. If a license is installed already, any imported licenses are dropped. If you still intend to import a license, you must perform a factory reset before you perform the import operation. If you import a license after deleting a temporary license, the imported license is dropped because you might still be able to reactivate the deleted license. The import operation preserves any licensing data. |
|
Clusters |
The following guidelines apply to importing a configuration file for nodes that belong to a cluster: When you perform an import operation on a cluster, all of the cluster nodes must be enabled and running. If you attempt to import a configuration into a cluster in which a node is not running, the import operation might hang or your import results might be unpredictable. The XML configuration that you import must contain the same set of nodes as the original cluster. The signature used to synchronize the cluster when the nodes are reenabled is derived from the IP addresses of the cluster nodes. Therefore, the remaining nodes cannot rejoin the cluster if the imported configuration yields a different signature. When import occurs, the imported configuration file overwrites the node-specific cluster configuration network settings of the remaining nodes. If you change the node-specific network settings, make sure you do not make the remaining nodes unreachable. After you have exported the file, do not modify settings that could render the primary node unreachable, such as changes to network settings. After you have exported the file, do not modify the XML to change the node name, IP address, or IP netmask. After you have exported the file, do not modify virtual port settings or add new virtual port settings. |
Exporting an XML Configuration File
To export an XML configuration file:
1.Select Maintenance > Import/Export > Export XML to display the configuration page.
Export XML File Configuration Page - Ivanti Connect Secure shows the configuration page for Ivanti Connect Secure.
2.Complete the configuration and export operation as described in Table.
Export XML File Configuration Page - Ivanti Connect Secure
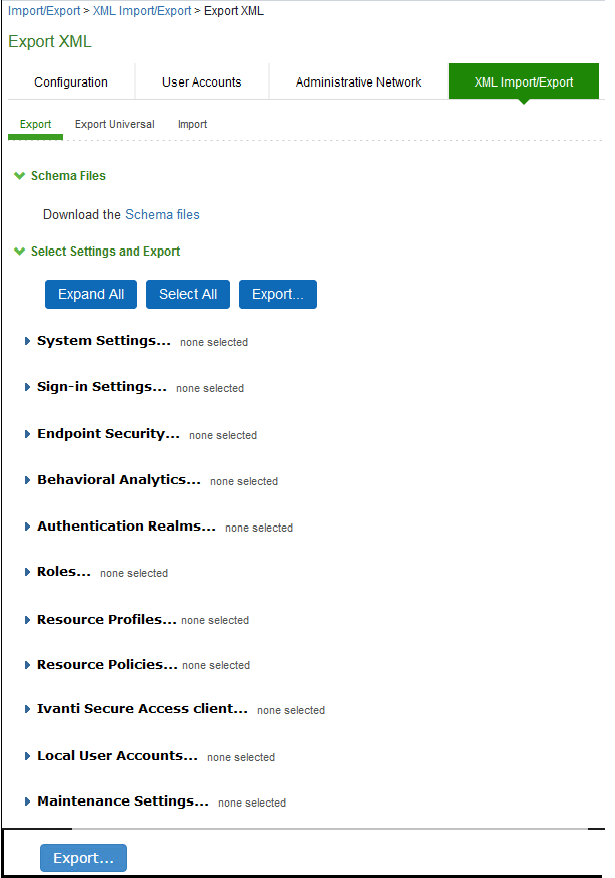
The following table lists the Exporting an XML Configuration File settings and guidelines:
|
Settings |
Guidelines |
|
Schema files |
Download the XML schema definition (.xsd) files that describe the XML. |
|
Select Settings and Export |
|
|
Expand All |
Expand the display of all settings groups. |
|
Select All |
Select all settings for all groups. |
|
Export |
Export the selected configuration data to an XML file. |
|
Settings |
|
|
System |
Expand this group and select settings found under the System menu. Do not select the DMI Agent unless Technical Support instructs you to do so. |
|
Sign-in |
Expand this group and select settings found under the Sign-in menu. |
|
Endpoint Security |
Expand this group and select settings found under the Endpoint Security menu. ESAP packages are encrypted when exported. |
|
Authentication Realms |
Expand this group and select authentication realm settings, including user realms and MAC address authentication realms. |
|
Roles |
Expand this group and select settings found under the Roles menu. |
|
Resource Profiles |
Ivanti Connect Secure only. Expand this group and select settings found under the Resource Profiles menu. |
|
Resource Policies |
Expand this group and select settings resource policies settings. |
|
Ivanti Secure Access Client |
Expand this group and select settings found under the client menu. |
|
Local User Accounts |
Expand this group and select local authentication server settings. |
|
Maintenance |
Expand this group and select settings found under the Maintenance menu. |
|
Export Settings? |
|
|
Export |
Export the selected configuration data to an XML file. |
Importing an XML Configuration File
To import an XML configuration file:
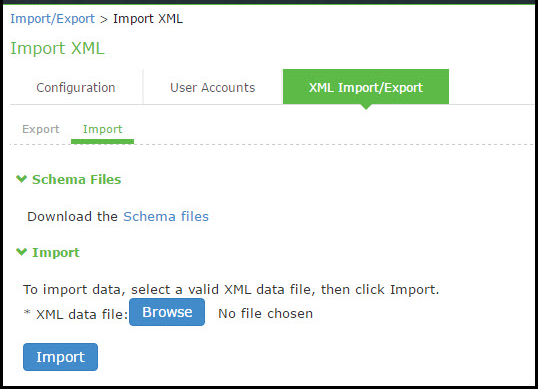
1.Select Maintenance > Import/Export > Import XML to display the configuration page.
Figure underneath shows the configuration page for Ivanti Connect Secure.
2.Complete the configuration and import operation as described in Table.
Import XML File Configuration Page
The following table lists the Import XML File Configuration and Action Guidelines:
|
Settings |
Guidelines |
|
Schema files |
Download the XML schema definition (.xsd) files that describe the XML. |
|
Import |
|
|
XML data file |
Locate and select the XML file. |
|
Import |
Import the file. The Import XML Results page is displayed. This page contains information about the imported network settings, roles, resource policies, and other settings. If there are errors in the XML, the import operation stops and rolls back the configuration to the previous state. Error messages are displayed on the Import XML Results page. |
Example: Using the Configuration XML File Import/Export Feature to Add Multiple Users
This example shows how to use the configuration XML file import/export feature. The example is illustrative. There are additional ways to use export files.
Assume you have just added a new device to the network, and you want to add your 2,000 users to the system. Instead of adding them one at a time in the admin console, you want to perform a mass import You can export the user accounts, extract the relevant XML that defines users, replicate each element as needed, and then import them. In this situation, your configuration should include the option to force the users to change their passwords the first time they log in to the system.
In this procedure, you only see examples for User 1, User 2, and User 2000. All other users are included in your import file. You set the passwords to numbered instances of the word password, such as password1, password2, and so on. All users in this example are assigned to the same auth server, although you can specify any combination of auth servers that are valid on your system.
To add multiple new users:
1.Select Maintenance > Import/Export > Export XML.
2.Follow the instructions to export local user accounts.
3.Save the exported file as users.xml.
4.Open the users.xml file.
5.Copy and paste the User container element repeatedly until you have added the necessary number of users. Although the example shows only three new users, you might add hundreds of new users to the file.
6.Update the appropriate data in each User container element as shown in "Example: Updating the User container”.
7.Save the users.xml file.
8.Select Maintenance > Import/Export > XML Import/Export > Import.
9.Click Browse to locate and select your users.xml file.
10.Click Import.
Example: Updating the User container
<configuration xmlns="http://xml.juniper.net/ive-sa/6.2R1"
xmlns:xsi="http://www.w3.org/2001/XMLSchema-instance">
<authentication>
<auth-servers>
<auth-server>
<local>
<users>
<user>
<username>user1</username>
<fullname>User1</fullname>
<password-cleartext>password1
</password-cleartext>
<one-time-use>false</one-time-use>
<enabled>true</enabled>
<change-password-at-signin>true
</change-password-at-signin>
</user>
<user>
<username>user2</username>
<fullname>User2</fullname>
<password-cleartext>password2
</password-cleartext>
<one-time-use>false</one-time-use>
<enabled>true</enabled>
<change-password-at-signin>true
</change-password-at-signin>
</user>
<name>System Local</name>
</auth-server>
</auth-servers>
</authentication>
</configuration>
Guidelines for Modifying Configuration XML Files
This topic provides guidelines for modifying an exported configuration file.
Preparing to Modify a Configuration XML File
The following practices might be useful when you export and import XML configuration elements:
•Define your goals for a particular task:
•What object or objects do you need to add, update, or delete?
•Do you need to complete all modifications in one operation, or can you modify the configuration in separate operations?
•Is your process a one-time operation, or do you need to perform the same operation multiple times?
•Are you updating an active system or are you using one configuration as a template for configuring systems that have not yet been brought online?
•Document the intended changes to the configuration objects:
•Make a list of objects to be added, updated, or deleted.
•For objects to add or update, list specific attribute data.
•List pages or tabs from the admin console that correspond to the objects and attributes you intend to change.
•Make a binary system snapshot or a binary configuration backup immediately before you perform the import.
•Make a plan to verify that the completed configuration meets your goals.
•View the Admin Access log to make sure the export and import operations succeeded.
•Perform a random check of the modified items. Make sure items were added, updated, or deleted as you expected.
•Make sure you are able to view configuration details in both the admin console and XML file while you work on the modifications, typically in the following sequence.
1.Use the admin console to correlate the configuration data with the data in the XML file.
2.Use the XML file to locate and modify the configuration data.
3.Use the admin console to verify the successful import.
•Use an XML editor. The exported XML files have a standard structure. Once you become familiar with the structure, you can navigate the files easily. The files can become large, so you might find it more efficient to use a commercial or open source XML editor. XML editors often separate the editable data from the structural display. This separation reduces or eliminates the risk of accidentally modifying an XML element rather than its data.
Understanding the XML Export File
When you export a configuration file, the system saves the configuration as an XML file. The data in the exported file is based on the selections you make when you configure the export operation. The file contains all of the required XML processing instructions and namespace declarations, which must be included exactly as defined.
The following table provides some basic information and guidelines to help you understand the structured XML used in the export file.
The following table lists the Structured XML Files: Basic Information and Guidelines:
|
Topic |
Guideline |
|
XML schema definition (.xsd) file |
The export is based on an XML schema. The schema is a separate file that defines the metadata, and that serves as a model or a template for the exported file. Use the XML schema file to: Identify the structure and sequence of configuration objects. Identify optional and required elements, allowable values, default values, and other attributes of the configuration objects. You can download the XML schema definition (.xsd) file in either of the following ways: From the XML Import/Export pages by clicking a link. From the URL where the files are stored on the system (you do not need to sign in). To access the .xsd file, access the following URL: |
|
Elements |
An element is a discrete XML unit that defines an object or part of an object. The element typically consists of a pair of tags that may or may not surround string data. Tags are surrounded by angle brackets (< >). |
|
Namespaces |
Namespaces allow you to use the same words or labels in your code from different contexts or XML vocabularies. Prefixing elements with namespace qualifiers allow the XML file to include references to different objects that originate in different XML vocabularies and that share the same name. If you do not prefix elements with namespace qualifiers, the namespace is the default XML namespace, and you refer to element type names in that namespace without a prefix. A namespace declaration looks like the following example: <configuration xmlns="http://xml.juniper.net/ive-sa/6.2R1" xmlns:xsi="http://www.w3.org/2001/XMLSchema-instance"> When you see namespace identifiers in your XML files, you do not need to be concerned about them, as long as you do not delete or modify the identifiers. |
|
Element Sequence |
You should avoid changing the sequence of elements in the XML file, whenever possible. Although the schema does not enforce sequence in all cases, you gain no benefit from changing the order of elements from the order in which they appear in the exported file, and, in some cases, you might invalidate the XML structure by changing element sequence. |
Every XML tag fits into one of the following XML tag types:
•Start tag-Defines the beginning of an element. The start tag consists of an open angle bracket (<), a name, zero or more attributes, and a close angle bracket (>). Every start tag must be followed by an end tag at some point in the document.
•End tag-Defines the end of an element. The end tag consists of an open angle bracket and a forward slash (</), followed by the same name defined in its corresponding start tag, and ends with a close angle bracket (>).
•Empty tag-The empty tag is denoted in two forms. If a tag pair has no data between them, the tag pair is considered an empty tag. Officially, according to the XML specification, an empty tag looks something like this:
<<empty tag example/>>
In this form, the empty tag consists of an open angle bracket (<), followed by an element name, a slash and a close angle bracket (/>). When you see an empty tag in your configuration files, it signifies an element that the schema requires to be included in the XML file, but whose data is optional.
Start tags can contain attributes, and tag pairs (elements) can contain additional elements. The following example shows an XML file for the Users object. In this example, you see only the Administrator configuration settings.
<configuration xmlns="http://xml.juniper.net/ive-sa/6.2R1"
xmlns:xsi="http://www.w3.org/2001/XMLSchema-instance">
<authentication>
<auth-servers>
<auth-server>
<local>
<users>
<user>
<username>admin</username>
<fullname>Platform Administrator</fullname>
<password-encrypted>3u+U</password-encrypted>
<one-time-use>false</one-time-use>
<enabled>true</enabled>
<change-password-at-signin>false</change-password-at-signin>
</user>
</users>
</local>
<name>Administrators</name>
</auth-server>
You make changes to the string data that is displayed between start and end tags. For example, using the preceding example, you can add to or change the following elements:
•<username>admin</username>
•<fullname>Platform Administrator</fullname>
•<password-cleartext>password</password-cleartext>
•<change-password-at-signin>false</change-password-at-signin>
•<name>Administrators</name>
The preceding sample displays the password element's data as encrypted data. You can modify the password if you change the element to password-cleartext. If you modify the password, the password value is visible until it is imported back into the system. Once imported, the system encrypts the password.
If you enter passwords for new users in cleartext format, the passwords are visible in the file, therefore, you might consider setting the Change Password at Next Login option to true.
- Because passwords are encrypted by default, they are fully portable from one system to another.
- Use the password-cleartext element and enter a text password when changing passwords through the XML file.
If you change a user for a given authentication server or an authentication server for a given user, you are creating a different user, not updating an existing user or authentication server. User and authentication server together logically define a unique user.
Comparing Configuration Settings and Values Shown in the User Interface with the Ones in the XML File
The elements in the XML file are closely related to the objects and their options as you see them in the admin console. The element names in the XML instance file correlate closely with the displayed object and option names.
For example, select Users > User Roles > [Role] > General > Session Options. The admin console renders the possible values for a roaming session as an option button group, consisting of the values:
•Enabled
•Limit to subnet
•Disabled
The following snippet from the exported configuration file shows the session options for the Users role. On the bolded line, the roaming session option is disabled:
<session-options><SessionOptions>
<MaxTimeout>60</MaxTimeout>
<RoamingNetmask />
<Roaming>disabled</Roaming>
<PersistentSession>false</PersistentSession>
</SessionOptions>
In the schema file, you can locate the allowable values for the roaming session option:
<Attribute roaming:START>
<xsd:element name="roaming" minOccurs="0">
...
<xsd:enumeration value="enabled">
...
<xsd:enumeration value="limit-to-subnet">
...
<xsd:enumeration value="disabled">
...
</xsd:element>
<Attribute roaming:END>
To change the value for the roaming session from Disabled to Limit to subnet, replace disabled with limit-to-subnet.
This example shows that the admin console often provides all of the allowable values, displayed either in an option button group, as check boxes, as list boxes, or as other types of user interface components. The XML file displays only the current state of your configuration. The schema file displays all of the actual values for the configuration options that are supported.
Understanding Referential Integrity Constraints
The system configuration objects are part of a data model that is enforced through the use of referential integrity constraints. You cannot change these constraints, but you should understand them before you attempt to delete objects that maintain dependencies to other objects.
If you violate the referential integrity constraints, your import operation fails.
In the following figure the boxes represent object types and the arrows represent dependent relationships between the object types. Arrows point from dependent objects to objects.
Object Referential Integrity Constraints
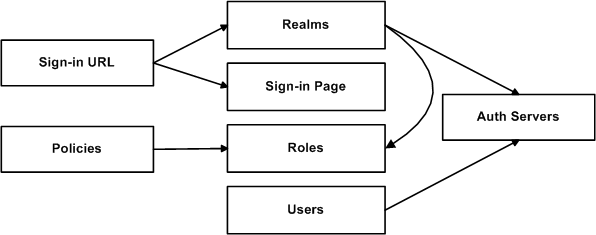
The system does not allow you to delete an object on which another object depends. Conversely, when you add an object, you must add any other objects on which that object depends.
Sign-in URLs depend upon realms and sign-in pages. Realms depend upon both authentication servers and roles. Policies depend upon roles. Users depend upon authentication servers.
Consider the following scenarios based on the preceding figure:
•If you add sign-in URLs, you must add realms, sign-in pages, roles, and authentication servers. You need to add an authentication server and at least one role to support the realm, and you must add the realm and the sign-in page to support the new sign-in URL.
•If you add a user, you must be able to assign it to an authentication server. If there is no authentication server on the target node yet, you must add one in the XML file.
•If you add a policy, you must be able to assign it to a role. If there is no role on the target system, you must add one in the XML file.
•If you delete an authentication server, you might strand realms and users, therefore, you need to make sure no realms or users depend on the authentication server before you attempt to delete it.
•If you delete a role, you might strand policies and realms. To delete a role, you must first delete any policy that depends upon the role, or reassign associated policies to another role. Also, to delete a role, you must first delete or reassign any realm that depends upon that role.
•If you delete a sign-in page, you might strand one or more sign-in URLs. To delete a sign-in page, you must first delete any associated sign-in URLs or reassign them to other sign-in pages.
Referential integrity checks are performed only during XML import.
Using Operation Attributes
Operation attributes define the positioning or action of XML data within the schema. If you do not specify an operation attribute, the modified data is merged by default.
XML data with an operation attribute has the following format:
<object1 xc:operation="operator for object1 and its children unless new operator is defined">
….
<object2>
…
<object3 xc:operation="operator for object3">
…
</object3>
…
</object2>
…
</object1>
The operation attribute is applied to all children objects unless a different operation attribute is defined in children objects.
The following operation attributes are supported:
•Merge-The configuration data identified by the element that contains this attribute is merged with the configuration at the corresponding level in the configuration datastore identified by the target parameter. This is the default behavior.
•Replace-The configuration data identified by the element that contains this attribute replaces any related configuration in the configuration datastore identified by the target parameter. Only the configuration actually present in the configuration parameter is affected.
•Create-The configuration data identified by the element that contains this attribute is added to the configuration if and only if the configuration data does not already exist on the device.
•Delete-The configuration data identified by the element that contains this attribute is deleted in the configuration datastore identified by the target parameter.
•Insert before-Changes the position of a configuration element in an ordered set.
•Insert after-Changes the position of a configuration element in an ordered set.
•Rename-Changes the name of one or more of a configuration object's identifiers.
If you are merging a list of objects to an existing list of objects in the configuration store, the results of the merged list might be unexpected. During a merge operation the order of the objects in the new list is not maintained. If you are importing a list of objects and would like to preserve the order of the new list, you should use the replace operation attribute. You can also use insert before or insert after to ensure that you produce the hierarchy that you intended.
Operation attributes are applied to elements recursively unless new operators are also defined within lower-level elements. There are limitations on the legal operator that can be used in child elements without conflict with the parent operator.The following table displays the legal operator relationships between parent and child elements.
The following table lists the Legal Operator Attribute Relationships:
|
Child > |
|
|
|
|
|
|
|
|
V-Parent |
Create |
Merge |
Replace |
Delete |
Insert |
|
|
|
before |
Insert |
|
|
|
|
|
|
|
after |
Rename |
|
|
|
|
|
|
|
None |
OK |
OK |
OK |
OK |
OK |
OK |
OK |
|
Create |
OK |
OK |
Error |
Error |
OK |
OK |
Error |
|
Merge |
OK |
OK |
OK |
OK |
OK |
OK |
OK |
|
Replace |
Error |
OK |
OK |
Error |
OK |
OK |
Error |
|
Delete |
Error |
OK |
Error |
OK |
Error |
Error |
Error |
|
Insert |
|
|
|
|
|
|
|
|
before |
OK |
OK |
OK |
OK |
OK |
OK |
OK |
|
Insert |
|
|
|
|
|
|
|
|
after |
OK |
OK |
OK |
OK |
OK |
OK |
OK |
|
Rename |
OK |
OK |
OK |
OK |
OK |
OK |
OK |
The following examples demonstrate the import operation:
Example 1: Set the MTU to 1500 on an interface named "Ethernet0/0" in the running configuration.
<interface>
<name>Ethernet0/0</name>
<mtu>1500</mtu>
</interface>
Example 2: Add an interface named "Ethernet0/0" to the running configuration, replacing any previous interface with that name.
<interface xc:operation="replace">
<name>Ethernet0/0</name>
<mtu>1500</mtu>
<address>
<name>192.0.2.4</name>
<prefix-length>24</prefix-length>
</address>
</interface>
NOTE: The default import modes have the following equivalent attributes on the root object of the configuration tree:
•Standard Import is always a merge operation.
•Quick Import is a create operation.
•Full Import is a replace operation.
Using the Push Configuration Feature
This topic describes the push configuration feature.
Push Configuration Overview
The push configuration feature supports simple configuration management across an enterprise without requiring you to deploy the systems as a cluster. You push a partial configuration from the running configuration on the source system to the running configuration on one or more target systems.
It is not desirable to push some groups of settings to a running configuration, so the following groups of settings are not supported:
•Network configurations
•Licenses
•Cluster configurations
•Certificates
•SNMP settings
•Syslog server settings
•Push configuration targets
Guidelines and Limitations
The following table lists the Push Configuration Guidelines and Limitations:
|
Category |
Guidelines and Limitations |
|
General |
The following guidelines and limitations apply: You can push a configuration to systems running the same software version (same build number) or higher software version. The source device pushes data over the management port (if configured) or the internal port. The target device can receive data over the internal or external port or management port. You can push to a single target or to multiple targets. For example, if you install several new systems, you can push a common configuration to set their initial configuration. When a configuration push job begins on a target, no warning is displayed, and the administrators are automatically logged out to avoid potential conflicts. For selected configuration push, if the configuration to be pushed contains one or more Ivanti Secure Access Client packages, we recommend you push the Ivanti Secure Access Client packages first considering one Ivanti Secure Access Client package per push and then push the remaining configurations. When the job has completed on a target, the target device restarts its services. Brief interrupts might occur while the service restarts. You must push to targets when they are idle or when you can accommodate brief interruptions. Immediately after pushing an Active Directory authentication server configuration, you must edit the configuration to change the Computer Object name. Unexpected problems might arise if two systems join an Active Directory domain using the same Computer Object name. You must delete the failed push jobs before performing a new push. When performing an entire configuration push, with changes to settings such as security settings, the target web server might get restarted during configuration import. As a result, the source might experience a lost connection. You can resume the job from the source at a later point to see the result of the import. |
|
Licenses |
The push configuration job does not push licenses or licensing settings. |
|
Clusters |
You can push a configuration to multiple targets, as long as targets are not part of the same cluster. You must not perform the clustering operations such as adding a cluster, deleting a cluster, and so on when performing a push configuration. If such events occur, then unsuccessful jobs will be aborted, and the backup files will be deleted. You can push a configuration to multiple targets, as long as targets are not part of the same cluster. You must not use VIPs during push configuration. Instead you must use the internal IP or the management IP of one of the nodes to create the target. You must delete the backed up configuration on the target node(s) as soon as possible to free up the disk space. |
Configuring Targets
To configure push configuration targets:
1.Select Maintenance > Push Config > Targets to display the target list and source options configuration page.
The Push Configuration Target List and Source Device Settings Page - Ivanti Connect Secure figure shows the configuration page for Ivanti Connect Secure.
2.Complete the configuration for the source options as described in Table.
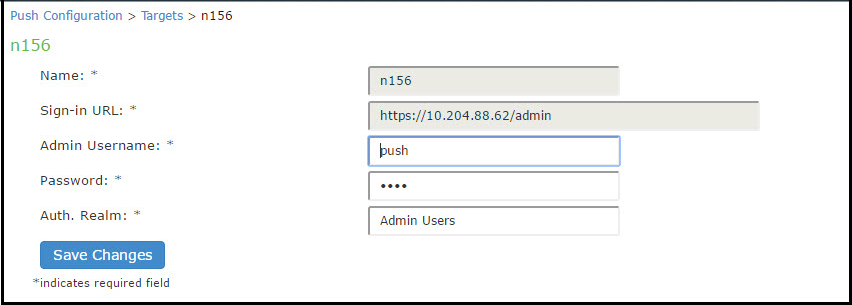
3.Click New Target to display the configuration page for targets.
Figure shows the configuration page for Ivanti Connect Secure.
4.Complete the configuration as described in Table.
5.Save the configuration.
Push Configuration Target List and Source Device Settings Page - Ivanti Connect Secure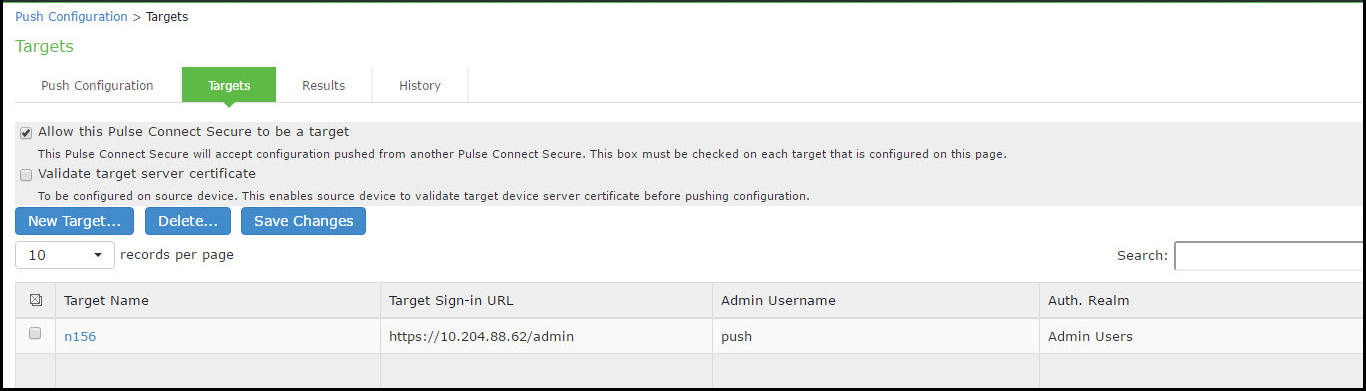
The following table lists the Push Configuration Target Source Device Configuration Options:
|
Settings |
Guidelines |
|
Select this option to allow the system to accept configuration pushed from another system. This option must be selected on targets, but does not have to be selected on the source system. |
|
|
Validate target server certificate |
Select this option on the source system if you want the source system to validate the target system server certificate before pushing the configuration. |
|
Save Changes |
Click this button if you have changed the source device configuration options described above. |
|
Delete |
Select a row in the table and click Delete to remove the target from the list. You cannot delete a target if it has push configuration results associated with that target. |
Push Configuration Targets Configuration Page:
The following table lists the Push Configuration Targets Configuration Guidelines:
|
Settings |
Guidelines |
|
Name |
Specify a name to identify the target within the system. Target names cannot be edited after they have been saved. |
|
Sign-in URL |
Specify the URL for the administrator sign-in page. Sign-in URLs cannot be edited after they have been saved. |
|
Admin Username |
Specify an account on the target system that the push configuration job can use to sign-in and make changes to the configuration. The job can make wide-ranging configuration changes, so the user must have full administrative privileges. In other words, the user must belong to the .Administrators role. |
|
Password |
Specify the corresponding password. |
|
Auth. Realm |
Specify the administrator authentication realm on the target system. The access management framework must be configured so that the job process (run as the username specified above) can sign in without any human interaction. For example, you cannot have dynamic credentials or multiple roles that are not merged, as these both require manual interaction. We recommend that you create an administrator account on each target that can be used exclusively for push configuration. Configure the administrator realm so that the realm policy and role mapping rules do not result in prompts requiring human interaction. For example, the user must be able to log in with static password authentication or two-factor tokens that do not use challenge-response type authentication. For example, certificates, Soft ID, and Defender Authentication are not supported. |
Configuring Push Settings
To configure the settings to be pushed:
1.Select Maintenance > Push Config > Push Configuration to display the configuration page.
The following Push Configuration Selected Settings Page figure shows the configuration page for Ivanti Connect Secure.
2.Complete the configuration and push configuration operation as described in Table Push Configuration Selected Settings and Action Guidelines.
Push Configuration Selected Settings Page
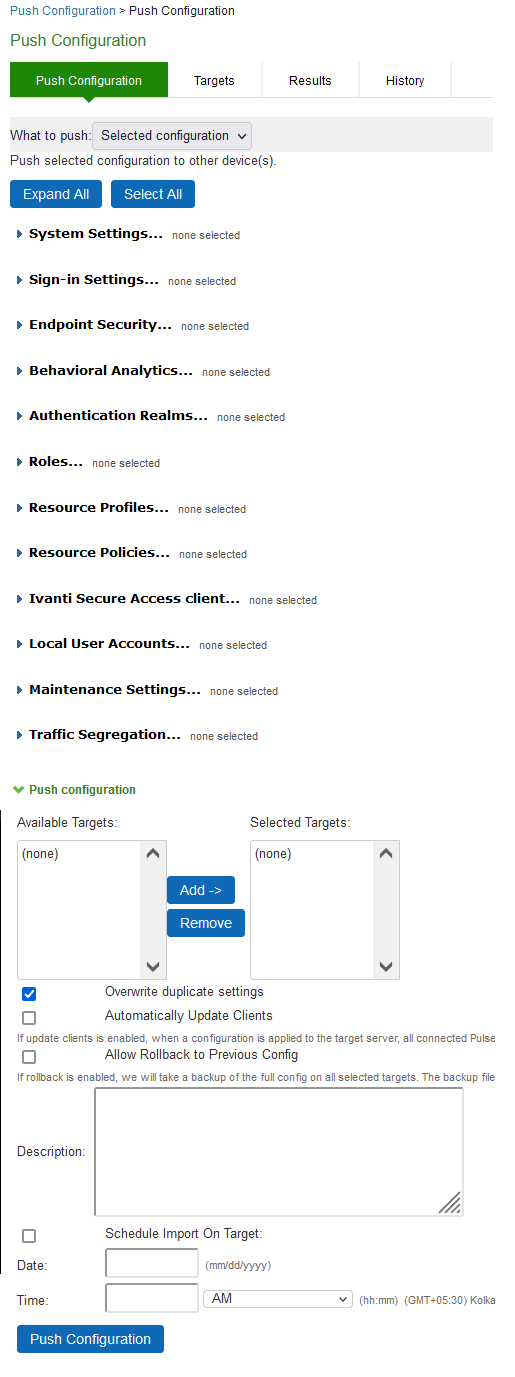
Push Configuration Selected Settings Page
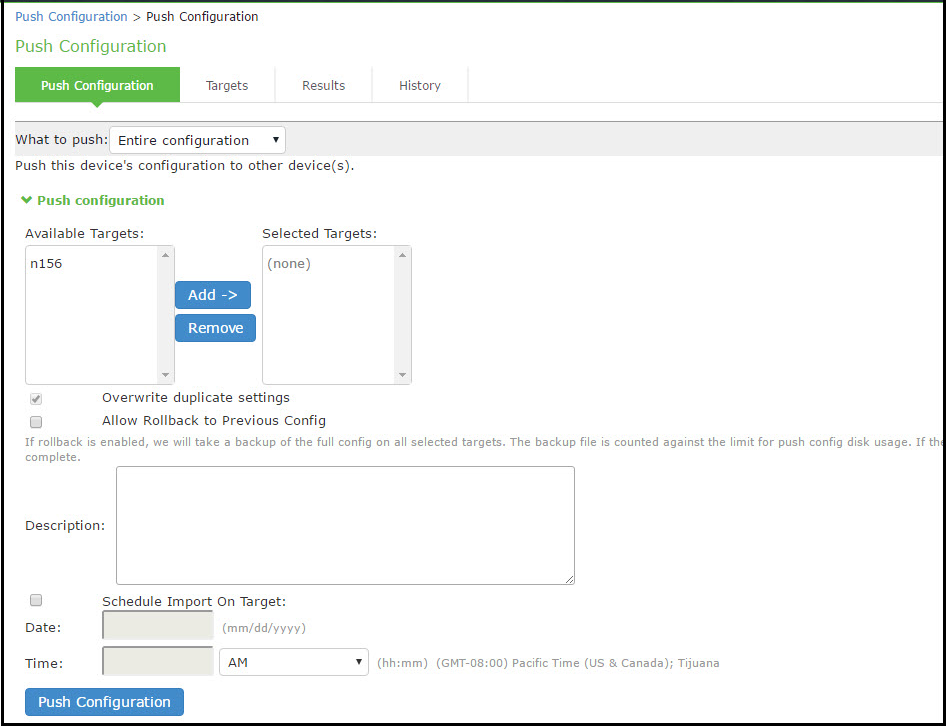
The following table lists the Push Configuration Selected Settings and Action Guidelines:
|
Settings |
Guidelines |
|
What to push |
Select Selected configuration or Entire configuration. If you select Selected configuration, the page displays controls to select settings groups. If you select Entire configuration, all settings from the source system are pushed, except for the following: Network configurations Licenses Cluster configurations Certificates SNMP settings Syslog server settings Push configuration targets |
|
Expand All |
Click this button to expand the display of all settings for all groups. |
|
Select All |
Click this button to select all settings for all groups. |
|
Settings |
|
|
System |
Expand this group and select settings found under the System menu. You cannot push host-specific network settings to a target. If you want to copy these settings to another system, use the configuration XML file import/export feature. |
|
Sign-in |
Expand this group and select settings found under the Sign-in menu. |
|
Endpoint Security |
Expand this group and select settings found under the Endpoint Security menu. ESAP packages are encrypted when exported. |
|
Authentication Realms |
Expand this group and select authentication realm settings, including user realms and MAC address authentication realms. |
|
Roles |
Expand this group and select settings found under the Roles menu. |
|
Resource Profiles |
Connect Secure only. Expand this group and select settings resource profiles settings. |
|
Resource Policies |
Expand this group and select settings resource policies settings. |
|
Ivanti Secure Access Client |
Expand this group and select settings found under the Secure menu. |
|
Local User Accounts |
Expand this group and select local authentication server settings. |
|
Maintenance |
Expand this group and select settings found under the Maintenance menu. |
|
Push Configuration |
|
|
Available Targets / Selected Targets |
Use the Add and Remove buttons to select the targets. |
|
Overwrite duplicate settings |
Select this option to overwrite settings on the target that have the same name as settings being pushed. If you do not select this option, the push configuration job copies only configuration objects that have names different from the configuration objects on the target. |
|
Allow Rollback to previous configuration |
Select this option to revert to a previous configuration state, effectively rolling back configuration changes. If you select this option, the local configurations on the target node will be backed up before importing the configurations. You can also undo the push configuration if you want to discard the changes and revert back to the previous state. We recommend you delete the backed-up configuration if the import is successful. If the target configuration is large the rollback of configurations can take several minutes to complete. |
|
Description |
Enter the description for the job. The job description is limited to 100 characters. |
|
Schedule Import on Target |
Select this option to allow a delayed import on the target node. If you select this option, the selection applies to all the targets in the job. The import schedule is measured in HH:MM (hours, minutes) format. The schedule is specified according to source's timezone. |
|
Push Configuration |
Click this button to push the selected configuration data to the specified targets. You can pause the push for a target during the push process. If errors occur during the push process, the job stops, and the configuration for the target is not imported. However, you can resume the failed push jobs. Error messages are displayed on the Results page. If you have specified multiple targets and a push configuration job to a target fails, the job continues to the next target until specified targets are updated (or fail). The results page displays the status and any problems encountered during the process. |
Viewing Configuration Push Results
|
Purpose |
The source system saves and displays the push configuration results in the Results tab. |
|
Action |
To view push configuration job results: |
1.Select Maintenance > Push Config > Results to display the results page.
The Push Configuration Results Page figure shows the results page for Ivanti Connect Secure. The push configuration results page auto refreshes for every 30 seconds.
2.Examine the results to verify success or learn the reasons the push job failed.
3.Click the job name to display additional information about the job.
4.Select a job and click Delete to remove it from the results page.
Push Configuration Results Page
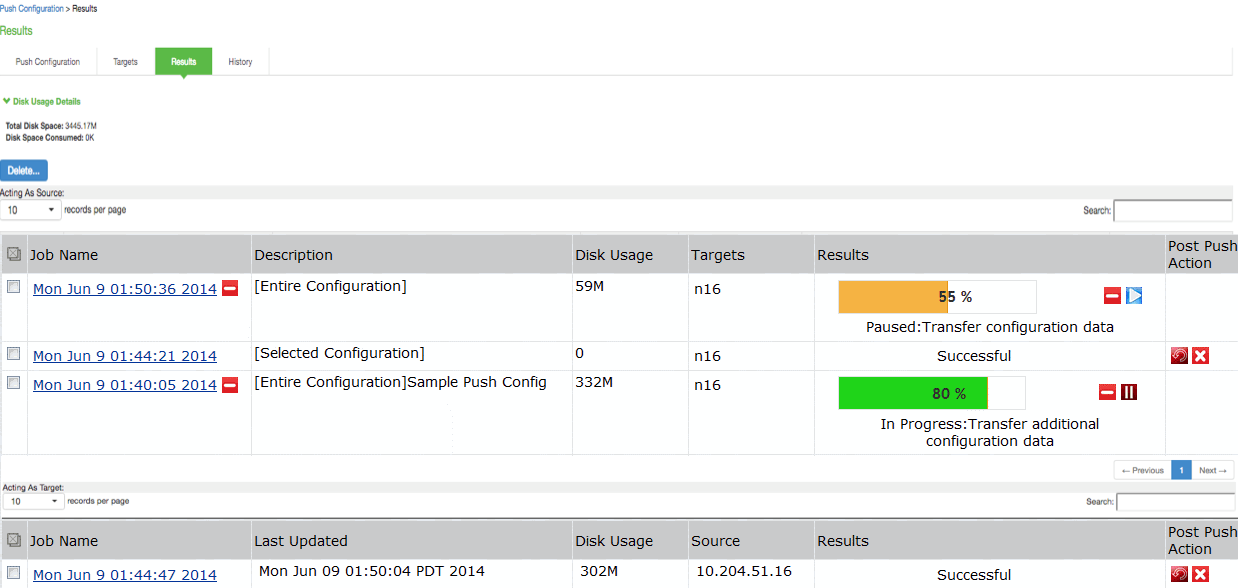
The following table describes the information displayed on the Results page and the various management tasks you can perform.
The following table lists the Push Configuration Results:
|
GUI Element |
Guidelines |
|
Disk Usage Details |
Displays the disk space available for push configuration and the disk space consumed by all the push jobs in the device. The disk space consumed by individual push jobs are also mentioned across each push job under the disk usage column. When total disk space consumed reaches the total disk space push jobs may fail and you can see the results column to see the failure message. You need to monitor the disk space consumed by push configuration to avoid push failures related to disk space limits. |
|
Description Column |
Displays the type of the push configuration. |
|
Disk Usage Column |
Displays the disk space used by the job. |
|
Results Column |
Displays the status of the transfer and result of post push action. It also displays the status of the push such as login, export, transfer, backup, import and so on. The status result message shows the type of data that is getting transferred. For a paused or failed target, the information on the current state of the job when it is paused, or failure reasons if any is displayed. This column also shows the progress of data transfer using a bar chart. For selected push additional configuration data (additional configuration data refers to configuration that is transferred only if it is modified or not available on the target) includes ESAP package, Ivanti Secure Access Client package, VDI configurations, Terminal services, Host Checker files, Custom sign in pages and notifications, and Applet files. For complete configuration push additional data includes ESAP and Ivanti Secure Access Client packages. |
|
Post Push Action |
Displays the options that the user can perform after the push such as roll back and delete backup. It also displays the post push actions such as rollback done, backup deleted, rollback failed, performing rollback, deleting back up and so on. |
|
Resume |
Select this option to resume a paused or a failed push. |
|
Undo |
Select this option to rollback to previous configuration that was backed up. Note that you can perform this operation only when the push is successful and Allow Rollback to Previous Configuration is selected. This option is available only if the backup is not deleted or undo is not done yet. |
|
Abort |
Select this option to cancel an entire push job or push to particular target within a job. An aborted push cannot be resumed. |
|
Pause |
Select this option to temporarily pause the push operation to a specified target. |
|
Delete Backup |
Select this option to delete the backup configuration on the specified target. Note that this option is available only when the users selects the Allow Rollback to Previous Configuration option during the push job. |
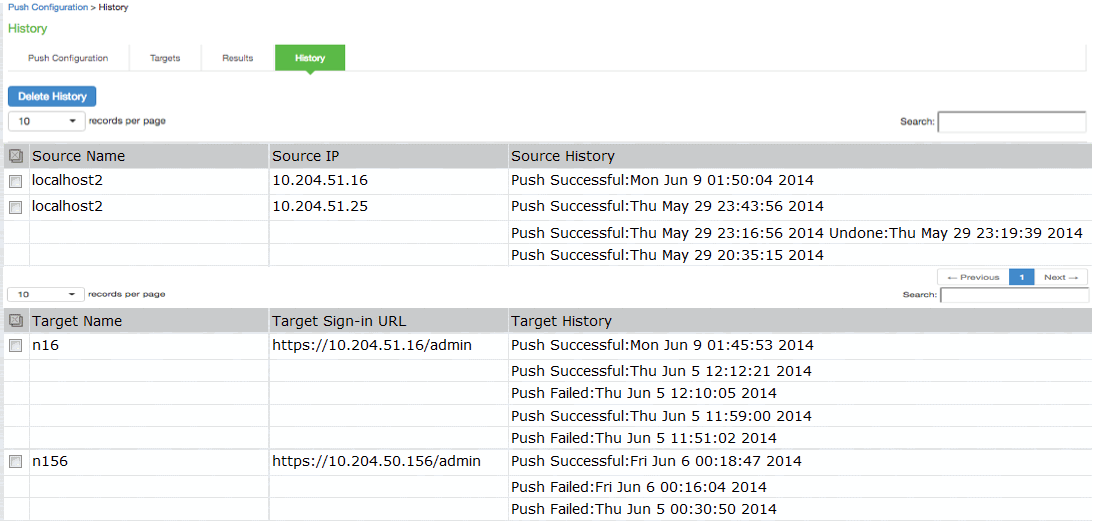
Viewing Configuration Push History
|
Purpose |
The source/target system saves and displays up to 5 push history results per target/source in the History tab. When the history table reaches 5 entries, the system removes the oldest result data when the next push configuration job is started. |
|
Action |
To view push configuration push history: |
1.Select Maintenance > Push Config > History to display the history page.
The following figure shows the history page for Ivanti Connect Secure.
2.Examine the history to verify success or learn the reasons the push job failed. The history page displays rollback history however the failure reason is not displayed. You can check the failure reason in the details page for each job. It also displays the timestamp history information of successful, failed push jobs, or if a configuration is undone.
3.Select the source name/target name and click Delete History to remove it from the History page.
Push Configuration History Page