Configuration File Administration
Configuring System Maintenance Options
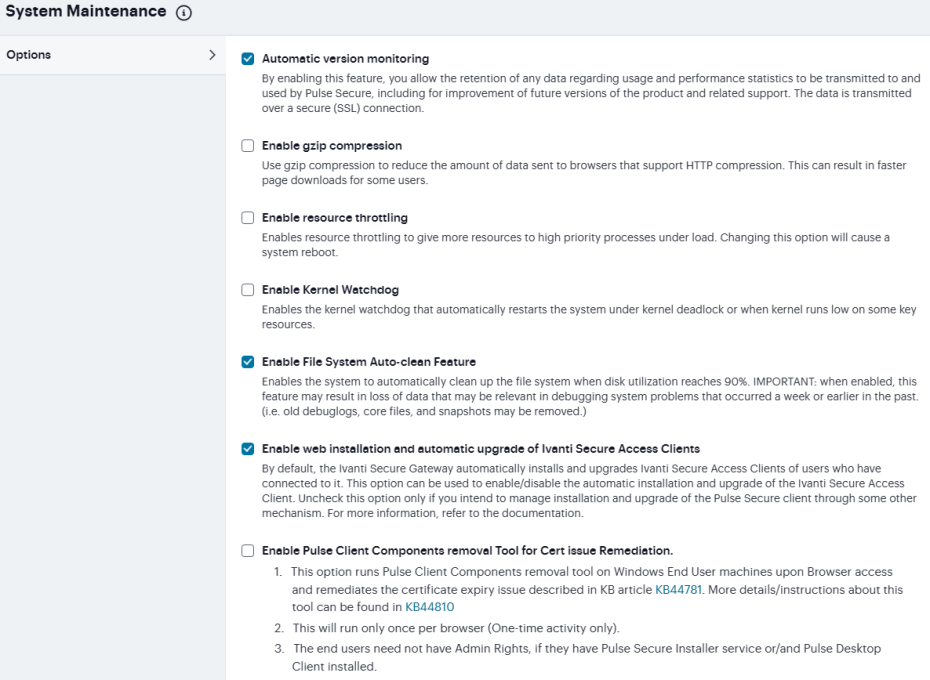
You can use the maintenance options page to enable various system maintenance features.
To enable various system maintenance features:
1.Select Maintenance > System > Options to display the maintenance options page.
2.Select options as described in the following table.
3.Save the configuration.
The following table lists the System Maintenance Options Configuration GuidelinesE:
|
Options |
Guidelines |
|
Automatic version monitoring |
If you enable this option, the system reports to Ivanti the following data: Machine identifier. Information describing your current software, including: Software build number and build name. An MD5 hash of your license settings. An MD5 hash of the internal interface IP address. If this node is in a cluster, the number of nodes within that cluster. Current state of the node. Cluster type (active/active, active/passive). Total number of unique subnets on the cluster nodes. Version of Ivanti Secure Access Client. Version of ESAP. Cluster log synchronization status. Total number of concurrent users on the device. Number of Ivanti tunnels. We strongly recommend that you enable this service. |
|
Enable gzip compression |
Connect Secure only. Use gzip compression to reduce the amount of data sent to browsers that support HTTP compression. This can result in faster page downloads for some users. |
|
Enable Kernel Watchdog |
Enables the kernel watchdog that automatically restarts the system under kernel deadlock or when kernel runs low on some key resources. Enable the kernel watchdog only when instructed by Technical Support. |
|
Enable resource throttling |
Enables system resource throttling in the system that gives system processes higher priority. High priority processes will get high resources under system load. Changing this option will cause a system reboot. |
|
Enable File System Auto-clean Feature |
Enables the system to automatically clean up the file system when disk utilization reaches 90%. The clean-up operation deletes files that might be relevant in debugging-for example, debug logs, core files, and snapshots might be deleted. |
|
Enable Web installation and automatic upgrade of Ivanti Secure Access Client |
After you deploy Ivanti Secure Access Client software to endpoints, software updates occur automatically. A Ivanti Secure Access Client can receive updates from the server. If you upgrade the Ivanti software on your Ivanti server, updated software components are pushed to a client the next time it connects. A bound endpoint receives connection set options and connections from its binding server, but it can have itsIvanti Secure Access Client software upgraded from any Ivanti server that has the automatic upgrade option enabled. During a client software upgrade the client loses connectivity temporarily. |
|
Enable Ivanti Secure Access Client Components removal Tool for Cert issue Remediation |
Provides an option for the Admin to enable users to download the Ivanti Secure Access Client Components removal (Ivanti Upgrade Helper) tool on Windows End User machines upon Browser access and remediates the certificate expiry issue. For more information, refer KB44781 and KB44810. |
|
Virtual Terminal console |
Enables the virtual terminal on a virtual appliance. Clear this check box to use the serial console. Changing this setting will restart the system. |
|
Java instrumentation caching |
Connect Secure only. Caches the Java instrumentation to improve the performance of Java applications. |
|
Show Auto-allow |
Connect Secure only. The auto-allow option provides the means to automatically add bookmarks for a given role to an access control policy, for example, Web bookmarks with auto-allow set are added to the Web access control policy. You only use this feature if you also use Resource Policies. We recommend that you use Resource Profiles instead. |
|
Do not show Task Guidance/Help page on admin login |
This option is applicable only in case there are no licenses installed. When enabled, Task Guidance/Help page does not appear automatically upon administrator login. |
|
Clear all configuration data at this device |
This option clears all keys and triggers a configuration reset and reboots the device. |
|
Prevent system overload |
Disallows user login, user login via Ivanti Secure Access Client, HTML5 connection or connection to a web resource when the CPU load is above a certain threshold. By default, this option is disabled for ICS upgrades and enabled for new installation. Exception: Admin logins, DMI and inbound REST calls are not blocked due to CPU overload. When a login to the HTML5 connection or connection to a web resource is blocked and when a user tries to log in, the login page will display an appropriate system busy message. To configure log events for User Access, in the System > Log/Monitoring > User Access > Settings tab, select the System Too Busy check box. By default, this option is enabled. Select System > Log Monitoring > User Access > Log to view the logs. |
|
Auto reboot the system |
This option automatically reboots the system when the appliance is in kernel panic state. |
|
End-user Localization |
Select one of the following options: Automatic (based on browser settings) English (U.S.) Chinese (Simplified) Chinese (Traditional) French German Japanese Korean Spanish |
|
External User Records Management |
|
|
Persistent user records limit |
Specify the maximum number of user records. This feature is useful when system performance is affected due to a large number of user records. We highly recommend you consult Technical Support prior to using this feature. Deleting a user record removes all persistent cookies, SSO information, and other resources for that user. It does not remove the user record from the external or internal authentication server. If you delete a user record and that user logs back in to the authentication server, new user records are created. Records are not removed if that user is currently logged in. |
|
Number of records to delete when the limit is exceeded |
Specify a number. Older records are removed first. A user record is not deleted if that user is currently logged in. |
|
Delete records now |
Check whether the persistent user records limit has been exceeded. If it is, delete the number of user records specified in the option above. |
|
Automatic deletion of user records periodically |
Check whether the persistent user records limit will be exceeded whenever a new user record is about to be created. If true, delete the records prior to creating the user new record. |
Using the Import/Export Feature for Binary System Configuration Files
This topic describes the import/export feature for binary system configuration files.
Binary System Configuration File Overview
The access management framework enables you to import and export the system and network settings using binary system configuration files. When importing a system configuration file, you can exclude the device certificate and the server's IP address or network settings from the imported information. For example, to set up multiple Ivanti Connect Secure systems behind a load balancer, import everything except for the IP address. To set up the system as a backup server, import everything except for the digital certificate and the network settings.
The binary system configuration file includes the following settings:
•Network settings
•Certificates. The system imports only device certificates, not the chains that correspond to the device certificates or trusted client CAs.
•Cluster configuration
•Licenses. When you import a configuration file that contains licenses, the system gives precedence to any existing licenses. Licenses are imported only if no licenses are currently installed.
•SNMP settings
•Sensor configuration. Sensor configurations are included in the system configuration file while sensor event policies are included in the user configuration file. To import or export all sensor-related settings, import or export both the system and user configuration files. The user configuration file, not the system configuration file, includes resource profiles, resource policies, and the local user database. To perform a complete backup, export both the system and user configuration files.
•Client-side logs. To import or export client-side logs, import or export both the system and user configuration files.
•Web proxy servers. Ivanti Connect Secure only. To export all web proxy related information, both the system and user configuration files are needed.
•Web caching options. Ivanti Connect Secure only.
•Rewriter filters. Ivanti Connect Secure only.
Exporting a Binary System Configuration File
To export a binary system configuration file:
1.Select Maintenance > Import/Export > Import/Export Configuration to display the configuration page.
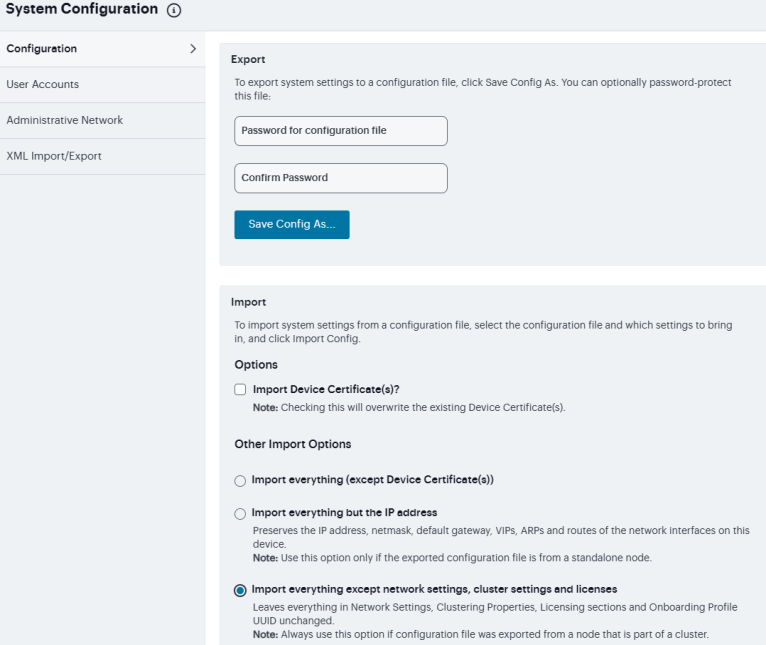
Export Binary System Configuration File Configuration Page - Ivanti Connect Secure shows the configuration page for Ivanti Connect Secure.
2.Complete the configuration and export operation as described in Table.
Export Binary System Configuration File Configuration Page - Ivanti Connect Secure
The following table lists the Export Binary System Configuration File Configuration and Action Guidelines:
|
Settings |
Guidelines |
|
Specify a password to encrypt and secure the configuration file. |
|
|
Confirm password |
Specify the password. |
|
Save Config As |
Display a dialog box to save the file to your local host. |
Importing a Binary System Configuration File
To import a binary system configuration file:
1.Select Maintenance > Import/Export > Import/Export Configuration to display the configuration page.
2.Complete the configuration and import operation as described in the following table.
The following table lists the Import Binary System Configuration File Configuration and Action Guidelines:
|
Settings |
Guidelines |
|
Import Device Certificate(s)? |
Overwrite the existing device certificate(s) with the ones in the imported configuration file. When importing a device certificate in to a FIPS device, note that you must choose a certificate that uses a FIPS-compliant private key. To ensure FIPS-compliance, select a certificate and corresponding security world private keys were generated on a FIPS device. |
|
Other Import Options |
|
|
Import everything (except Device Certificate(s)) |
Import all settings except the device certificate. |
|
Import everything but the IP address |
Do not overwrite the existing configuration for network interface IP addresses, netmask, default gateway, virtual interfaces, ARP tables, and route tables. Use this option only if the exported configuration file is from a standalone node. To set up multiple nodes in a cluster behind a load balancer, import everything except the IP address. |
|
Import everything except network settings, cluster settings, and licenses |
Do not allow the imported configuration to change the existing configuration for settings found in the Network Settings and Licensing sections. With this option, network configurations, licenses, cluster configurations, certificates, defined SNMP settings and syslog configurations are not imported. Always use this option if configuration file was exported from a node that is part of a cluster. To set up a backup node, import everything except network settings and digital certificates. |
|
Import only Device Certificate(s) |
Import the device certificate(s) only. You must also select the Import Device Certificate(s) check box. |
|
Config file |
Use the browse button to locate and select the file from your local host. |
|
Password |
Specify the password (if applicable). |
|
Import Config |
Import the configuration file. |
Using the Import/Export Feature for Binary User Configuration Files
This topic describes the import/export feature for user configuration binary files.
Binary User Configuration File Overview
In general, if a menu item falls under the Authentication, Administration, or Users menu, the item is included in the user configuration file (user.cfg). The exception is Sensors event policies, which are under System, but which are exported in the user configuration file. In particular, the user configuration file includes the following settings:
•Sign-in settings (includes sign-in policies, sign-in pages, all authentication servers, authentication protocol sets, and Ivanti settings)
•Authentication realms (including admin realms, user realms, and MAC authentication realms)
•Roles
•Resource profiles. Ivanti Connect Secure only.
•Resource policies
•Sensor event policies
•User accounts
•Client-side logs. To export or import client-side logs, export or import both the system and user configuration files.
Exporting a Binary User Configuration File
To export a binary user configuration file:
1.Select Maintenance > Import/Export > Import/Export Users to display the configuration page.
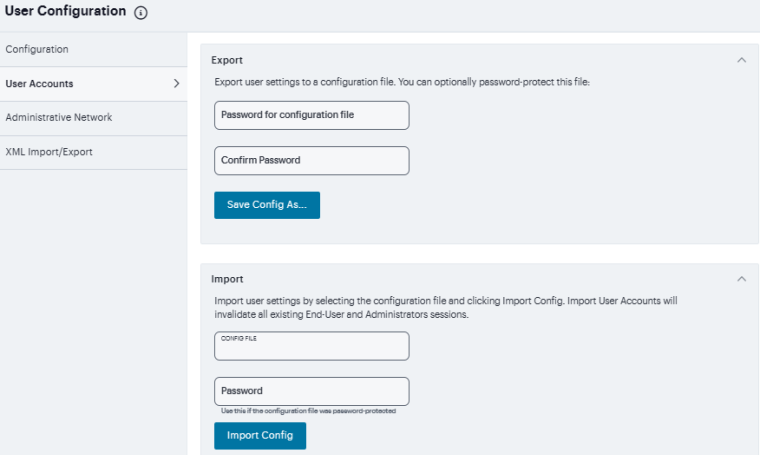
Binary Export User Configuration File Configuration Page - Ivanti Connect Secure shows the configuration page for Ivanti Connect Secure.
2.Complete the configuration and export operation as described in Table.
Binary Export User Configuration File Configuration Page - Ivanti Connect Secure
The following table lists the Binary Export User Configuration File Configuration and Action Guidelines:
|
Settings |
Guidelines |
|
(Optional) Specify a password to encrypt and secure the configuration file. |
|
|
Confirm password |
Specify the password. |
|
Save Config As |
Display a dialog box to save the file to your local host. |
Importing a Binary User Configuration File
To import a binary user configuration file:
1.Select Maintenance > Import/Export > Import/Export Users to display the configuration page.
2.Complete the configuration and import operation as described in the following table.
Import User Configuration Binary File Configuration Page
The following table lists the Import Binary User Configuration File Configuration and Action Guidelines:
|
Settings |
Guidelines |
|
Config file |
Locate and select the file from your local host. |
|
Password |
Specify the password (if applicable). |
|
Import Config |
Import the configuration file. |
Using the Import/Export Feature for XML Configuration Files
This topic describes the import/export feature for XML configuration files.
XML Configuration File Overview
The system maintains its configuration in a structured XML file. This enables the system to support an alternative to the complete configurations that are exported and imported with the configuration binary files. You can use the export/import configuration XML pages to export and import selected configuration elements.
You might find the feature useful when performing the following tasks:
•Adding to the configurations of peer nodes, for example, adding a large number of users.
•Modifying multiple instances of a single setting, for example, an authentication server name.
•Deleting settings, for example, deleting authentication servers that are no longer used.
•Creating a configuration template to use for setting up new nodes.
•Tracking configuration changes by comparing differences on periodic exports.
Guidelines and Limitations
The following table summarizes the guidelines and limitations for using the XML import/export feature.
The following table lists the XML Import/Export Guidelines and Limitations:
|
Category |
Guidelines and Limitations |
|
General |
The following guidelines and limitations apply: You can import and export configuration files only between systems running the same software version. If XML configuration to be imported contains one or more Ivanti Secure Access Client packages, we recommend to split the configuration to import only Ivanti Secure Access Client packages first considering one Ivanti Secure Access Client package per import and then import the remaining configurations. You might find it useful to use a text editor to modify configuration elements that ought to be distinguished, such as configuration object names and descriptions. Never modify the names of the NIC identifiers. The system relies on knowing that each appliance has two interface cards, known as NIC0 and NIC1. Immediately after importing an Active Directory authentication server configuration, you must edit the configuration to change the Computer Object name. Unexpected problems might arise if two systems join an Active Directory domain using the same Computer Object name. |
|
Licenses |
The following rules apply to exported and imported licenses: You cannot edit the license data that is exported. It is encrypted. An XML import of licenses is valid only if the system does not currently have a license installed. If a license is installed already, any imported licenses are dropped. If you still intend to import a license, you must perform a factory reset before you perform the import operation. If you import a license after deleting a temporary license, the imported license is dropped because you might still be able to reactivate the deleted license. The import operation preserves any licensing data. |
|
Clusters |
The following guidelines apply to importing a configuration file for nodes that belong to a cluster: When you perform an import operation on a cluster, all of the cluster nodes must be enabled and running. If you attempt to import a configuration into a cluster in which a node is not running, the import operation might hang or your import results might be unpredictable. The XML configuration that you import must contain the same set of nodes as the original cluster. The signature used to synchronize the cluster when the nodes are reenabled is derived from the IP addresses of the cluster nodes. Therefore, the remaining nodes cannot rejoin the cluster if the imported configuration yields a different signature. When import occurs, the imported configuration file overwrites the node-specific cluster configuration network settings of the remaining nodes. If you change the node-specific network settings, make sure you do not make the remaining nodes unreachable. After you have exported the file, do not modify settings that could render the primary node unreachable, such as changes to network settings. After you have exported the file, do not modify the XML to change the node name, IP address, or IP netmask. After you have exported the file, do not modify virtual port settings or add new virtual port settings. |
Exporting an XML Configuration File
To export an XML configuration file:
1.Select Maintenance > Import/Export > Export XML to display the configuration page.
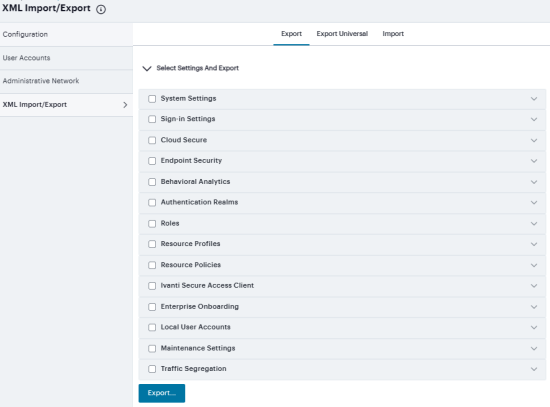
Export XML File Configuration Page - Ivanti Connect Secure shows the configuration page for Ivanti Connect Secure.
2.Complete the configuration and export operation as described in Table.
Export XML File Configuration Page - Ivanti Connect Secure
The following table lists the Exporting an XML Configuration File settings and guidelines:
|
Settings |
Guidelines |
|
Select Settings and Export |
|
|
Expand All |
Expand the display of all settings groups. |
|
Select All |
Select all settings for all groups. |
|
Export |
Export the selected configuration data to an XML file. |
|
System |
Expand this group and select settings found under the System menu. Do not select the DMI Agent unless Technical Support instructs you to do so. |
|
Sign-in |
Expand this group and select settings found under the Sign-in menu. |
|
Endpoint Security |
Expand this group and select settings found under the Endpoint Security menu. ESAP packages are encrypted when exported. |
|
Authentication Realms |
Expand this group and select authentication realm settings, including user realms and MAC address authentication realms. |
|
Roles |
Expand this group and select settings found under the Roles menu. |
|
Resource Profiles |
Ivanti Connect Secure only. Expand this group and select settings found under the Resource Profiles menu. |
|
Resource Policies |
Expand this group and select settings resource policies settings. |
|
Ivanti Secure Access Client |
Expand this group and select settings found under the client menu. |
|
Local User Accounts |
Expand this group and select local authentication server settings. |
|
Maintenance |
Expand this group and select settings found under the Maintenance menu. |
|
Export |
Export the selected configuration data to an XML file. |
Importing an XML Configuration File
To import an XML configuration file:
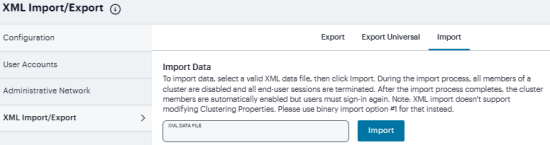
1.Select Maintenance > Import/Export > Import XML to display the configuration page.
Figure underneath shows the configuration page for Ivanti Connect Secure.
2.Complete the configuration and import operation as described in Table.
Import XML File Configuration Page
The following table lists the Import XML File Configuration and Action Guidelines:
|
Settings |
Guidelines |
|
XML data file |
Locate and select the XML file. |
|
Import |
Import the file. The Import XML Results page is displayed. This page contains information about the imported network settings, roles, resource policies, and other settings. If there are errors in the XML, the import operation stops and rolls back the configuration to the previous state. Error messages are displayed on the Import XML Results page. |
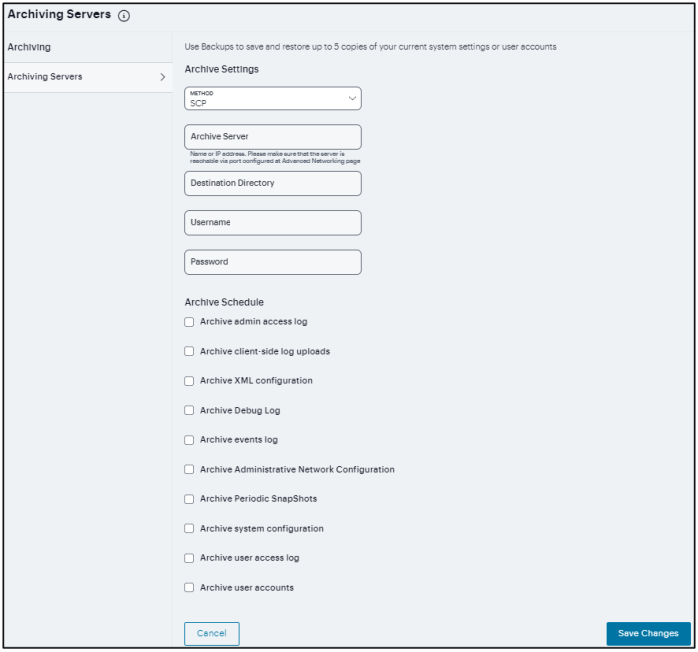
Archiving Servers
You can schedule periodic archiving for system logs, system configuration files, and system snapshots. Periodic archiving occurs only at the scheduled time. "Unscheduled" archiving does not occur automatically.
To configure log archiving:
-
In the Maintenance > Archiving > Archiving Servers page, select Method from the drop-down list.
-
Enter the fully qualified Domain name or IP address of the server to which to send the archive files.
-
Enter the Destination directory.
-
Enter a Username and Password that has privileges to log into the server and write to the destination directory.
-
Select the required Archive Schedule options.
-
Click Save Changes.